Project Description
Observe the sample changes by SEM, measure details with AFSEM®
A detailed study of material fracture surfaces is routinely used to address the cause of failure in engineering structures. At the nano-scale it is a main research area in material science to develop and evaluate theoretical models of crack growth behavior.
Consequently, the tensile stage carrying the sample can be accessed interactively, allowing a stepwise increase of tensile stress with in-between analysis, without the necessity to vent the SEM and take out the sample for each AFM analysis step, as would be required when using a separate AFM system.
The scanning electron microscope (SEM) is a powerful tool to study the surface changes and fracture mechanics of tensile stress samples.
The combination of a large field of view with nanometer resolution allows detecting the early stages of crack or fracture formation, sample deformation, breakage analysis and other surface defects like changes in roughness.
However, quantitative height information and crack/roughness analysis with sub-nanometer resolution is not possible with the SEM.
With AFSEM® , the strengths of SEM and AFM are easily combined with tensile stages for correlative, in-situ analysis of tensile stress samples. The tip-scanning instrument does not interfere with the use of a tensile stage.

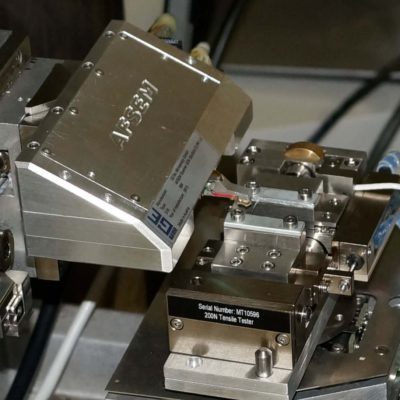
Philips XL40 SEM equipped with a Deben MICROTEST 200N tensile stage and AFSEM™

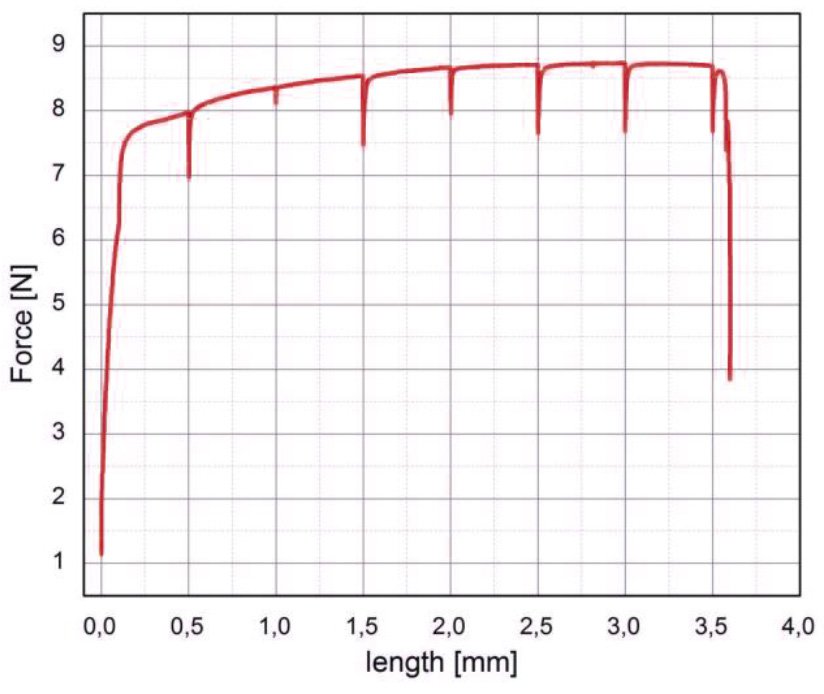
Tensile force on a copper wire as function of length during 500 µm step wise increments
Using a tensile stage, the length of the sample is increased step-by-step, during which the tensile force is monitored. Between steps, the length is kept constant, allowing the sample to relax.
This is accompanied by a drop in force. Next, the sample surface analysis is carried out with SEM and AFSEM® in situ.
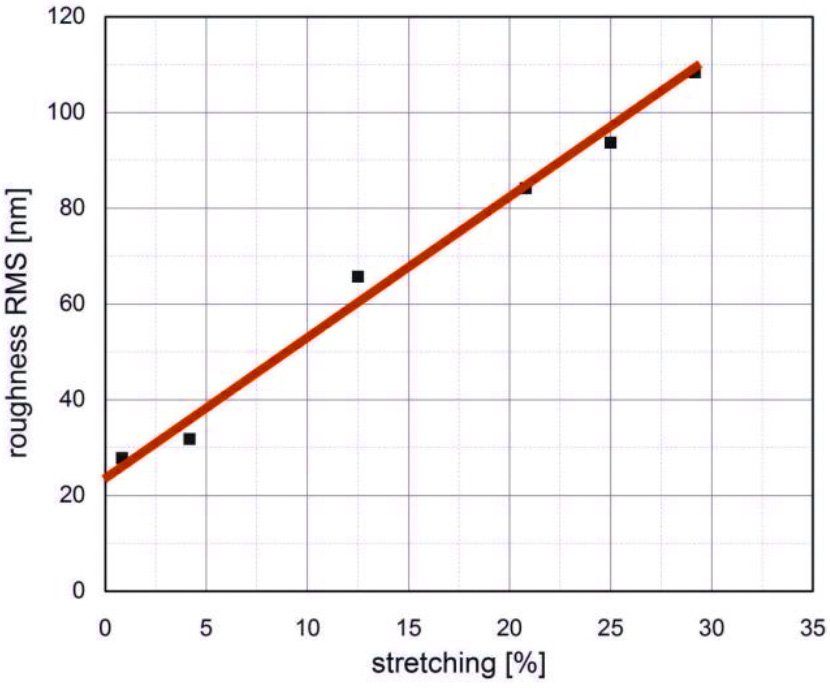
The SEM provides the overview information and helps to identify the region of interest and ensures imaging of the same position with the AFM. The AFM is used to obtain detailed 3D information with nanometer resolution and among other things allows determination of roughness changes with sub-nanometer accuracy.
The SEM was essential for re-positioning the cantilever, because the sample inherently shifts during stretching.
As can be seen from the arrows pointing at the same feature in subsequent images, the recorded AFM images and extracted roughness parameters have been obtained on the same area of interest and can be correlated with the recorded data from the tensile stage (i.e. tensile force or length deformation).

SEM & AFM analysis at progressing levels of stretching

Roughness as a function of stretching with 500 µm stepwise increments.
In summary, AFSEM<span class=”registered-trademark”>®</span> is the solution of choice for obtaining detailed correlative information of smallest surface changes and quantitative data on crack formation or crack growth, roughness increase, or any other material deformation in dependence on tensile stress.
The SEM allows guiding the AFM to the regions of interest, e.g. to image areas of constrictions or with increasing number of cracks. The AFSEM<span class=”registered-trademark”>®</span> can even scan on a free standing wire after a breakage occurred.
- Correlative in-situ SEM&AFM analysis combined with tensile stage
- SEM guided repositioning of cantilever
- Quantitative data on any material deformation

